The Sugar Secret Behind Perfect Red Braised Pork
Here’s a confession: I ruined more batches of caramel than I care to admit before I figured out what was going wrong. Thirty seconds. That’s the difference between gorgeous, amber perfection and a smoking pan of bitter regret. And it’s exactly why so many home cooks skip this step entirely or end up with sad, muddy looking red braised pork that tastes like… just soy sauce and disappointment.
You deserve better than that. So let’s talk about how to actually nail this.
Why Bother With Caramel At All?
I get it. Adding an extra step that involves hot, molten sugar sounds like a recipe for stress. But here’s the thing: dark soy sauce alone? It just looks… brown. Kind of dull. Sugar alone? Candy. But together? That’s where you get the deep red gold sheen, that lacquered finish, that flavor that balances sweet, savory, and this tiny bitter edge that makes the whole dish interesting.
The caramel also gives your pork a tacky coating so the braising liquid actually clings to the meat instead of sliding off like it has somewhere else to be. Skip this step, and honestly, you’ve just made generic soy pork. Which is fine! But it’s not red braised pork.
Rock Sugar or Regular Sugar?
Both work. I’ll say that upfront so you don’t stress about hunting down rock sugar at an Asian grocery store (though if you’re there anyway, grab some it’s pretty).
Rock sugar melts slower, which gives you more breathing room to watch the color develop. It’s the traditional choice, and some people swear it adds extra shine.
White sugar melts faster, which means the window between “perfect” and “burnt” shrinks. If you’ve scorched caramel before (hi, it’s me, I’ve done this many times), rock sugar is your friend.
Either way, you’re aiming for the same target: light golden amber. Like pale honey. Not brown. Not dark. Pale honey.
How to Actually Spot the Right Color
Forget timers. They’ll lie to you. Every stove is different, every pan is different, and sugar doesn’t care about your schedule.
Use your eyes. Work under the brightest light you have color looks lighter than it actually is, especially in a dark pan. Tilt the pan to catch the reflection.
Here’s what you’re looking for:
- Clear/white: Sugar’s not melted yet. Keep the heat low, swirl the pan, be patient.
- Light amber: Pale honey color, maybe a faint wisp of smoke. THIS IS IT. Add the pork NOW.
- Medium amber: Deeper gold, strong toasty smell. Still usable, but you’re on borrowed time.
- Dark amber/brown: Sharp smell, looks like coffee. It’s burnt. I’m sorry. Dump it and start over.
Trust your nose, too. A sweet, nutty, toasted smell? You’re golden (literally). A sharp, acrid smell? It’s gone too far, even if your eyes disagree. Noses don’t lie.
Once you hit light amber, you have about ten seconds to act. Which brings me to the thing that saves you here.
Low Heat Is Your Best Friend
I cannot stress this enough: low heat buys you time.
High heat turns that reaction window into basically nothing. One second you’re fine, the next you’re scraping burnt sugar off your pan and questioning your life choices.
Also and this tripped me up for way too long the pan keeps cooking after you take it off the heat. Sugar continues darkening for another 5-10 seconds from residual heat alone. So pull it a little early and let the pan finish the job.
Budget about five minutes total for the caramel part on low heat. The last minute is where most disasters happen. If things are darkening faster than you expected, drop that heat immediately. Waiting an extra minute is way better than throwing out a batch.
Quick Note on Pans
Use something heavy. A thick bottomed wok or a heavy pot. Thin pans have hot spots, and hot spots burn sugar.
Skip nonstick the high caramel temps can damage the coating, and the dark surface makes it harder to judge color anyway.
And please, use a long handled spoon or spatula. Hot sugar is no joke (more on that in a sec).
The Classic Method: Oil + Sugar
This is how a lot of Chinese home cooks do it. The oil spreads heat evenly and helps prevent sudden scorching.
Start with your pork: Put your pork belly in cool water, bring it to a boil, cook three minutes for a quick pre boil step, drain, and pat it completely dry. (Wet pork + hot oil = terrifying splattering. Ask me how I know.) Cut into 1-2 inch cubes.
Brown the pork: Add a couple tablespoons of neutral oil to your wok or pot over medium heat. Fry the cubes for 5-7 minutes, turning them until they’re lightly golden and some fat has rendered out. That browned surface is what the caramel grabs onto. Move the pork to a bowl but leave that rendered fat in the pan.
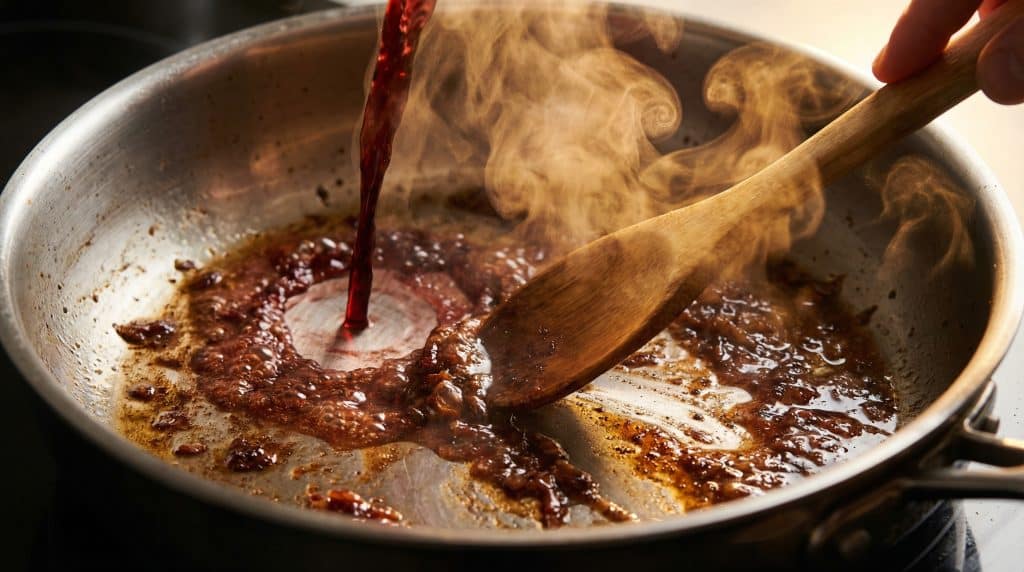
Make the caramel: Drop heat to low or medium low. Add 1-3 tablespoons of sugar to the fat. Don’t stir just swirl the pan or nudge things around to spread the sugar. Stirring can introduce moisture and make the sugar seize up into a grainy mess. Let it melt until you hit that light amber.
Coat the pork: The second you see that pale honey color, bump heat to medium and add the pork back. Toss everything vigorously for 1-2 minutes until every piece looks glossy. Don’t wait for deep color in the pan that develops during braising.
Deglaze: While the caramel’s still loose, splash in some Shaoxing wine (1-3 tablespoons) and scrape up any stuck bits. Add your soy sauces, aromatics for five spice braising flavors (ginger, star anise, scallion whites), and enough water or stock to barely cover the pork. Stir until the caramel dissolves, and you’re off to the races.
The Shortcut (For Those of Us Who’ve Been Burned)
If the oil method sounds stressful, I hear you. Try this instead:
Brown your pork first, just like above. Then add 3 tablespoons of white sugar directly into the hot pork and rendered fat. Stir constantly for about two minutes as the sugar melts and browns around the meat.
You lose some precision on the exact caramel stage, but here’s the magic: scorching is way harder because the pork and fat absorb the excess heat. The color keeps building during the braise anyway.
Is it the classic technique? No. Do the results get embarrassingly close? Yes. Once everything looks glossy and lightly golden, deglaze and proceed as usual.
When Things Go Wrong (And How to Fix Them)
Burnt caramel: If it’s dark brown and smells sharp, it’s toast. Literally. Dump it, clean the pan, start over. Burnt sugar stays bitter there’s no saving it.
Grainy, crystallized sugar: Moisture got in, or you stirred too soon. Try adding a tablespoon of water, keeping heat low, and stirring gently. Sometimes it smooths out. If it won’t recover, restart. Prevent this by keeping your pan dry and swirling instead of stirring.
Hard lumps when you add liquid: Cold liquid hitting very hot caramel causes this. Keep heat at medium low and stir the lumps usually melt back down in a minute or two. Add liquids slowly next time. Pour down the side of the pan instead of straight into the center.
A Quick Word on Safety
Caramel runs way hotter than boiling water, and it sticks. To your pan. To your spoon. To your skin (please don’t let it do that).
Make sure your pork is dry before it hits hot fat. When you add braising liquid to hot caramel, pour slowly down the side of a tilted pan and keep your face back steam rises fast. Long sleeves help. Long handled utensils help more. Turn on your range hood. Keep kids and pets away.
Okay, safety lecture over.
Just Try It Once
Here’s my challenge for you: before you make a whole batch of red braised pork, do a practice run. Just sugar and a little water in a pan. Watch it melt. Watch the color change. Smell the stages. Get a feel for it with nothing at stake except a spoonful of sugar.
Once you’ve seen that light amber in person once you know what it looks like and how fast the window closes the whole process stops being scary and starts being kind of fun.
And the next time you serve red braised pork with that deep, glossy, magazine worthy finish? You’ll know exactly how you got there.